Microsoft Bing Maps Discontinued Services

Introduction
On May 21, 2024, Microsoft announced the deprecation of several key features and services within Bing Maps (Link),  signaling a new direction for organizations relying on these tools for geospatial needs. As many businesses and developers have depended on Bing Maps for location-based services, it is crucial to understand what’s changing, how it affects your workflows, and the recommended alternatives.

The article states that “Customers with an enterprise license have until June 30, 2028, to transition to Azure Maps, while customers on the free and basic license for Bing Maps for Enterprise have until June 30, 2025”.

In this post, we’ll explore the discontinued Bing Maps services, the rationale behind these changes, and how Azure Maps is now the go-to solution for all your geospatial needs.

What is Changing?
Microsoft has released a comprehensive list of Bing Maps services that are being phased out. These services have been essential for many organizations, offering functionalities such as geocoding, routing, traffic data, and more. The main services being deprecated include:

  • Bing Maps REST Services
  • Bing Maps SOAP Services
  • Bing Maps Web Control 6.3

These services have powered numerous location-based applications, but with evolving technology standards and performance expectations, Microsoft is retiring them to make way for newer, more robust solutions.

Why Is Microsoft Making These Changes?
Microsoft’s decision to discontinue these services is driven by a focus on modernization and a shift toward cloud-native solutions. Older technologies like the Bing Maps SOAP Services and Web Control have become outdated, with newer tools offering better performance, security, and integration capabilities.

This change also reflects broader trends in the industry, with cloud-based services becoming more dominant, offering better scalability, real-time data processing, and higher levels of security.

Azure Maps: The New Standard
As Microsoft phases out Bing Maps, Azure Maps emerges as the recommended and supported geospatial service. Built on the Azure cloud platform, Azure Maps offers a comprehensive suite of mapping and location-based services designed to meet modern business needs.

Steps to Transition to Azure Maps

Audit Your Bing Maps Integrations: Conduct a thorough audit of all the places where Bing Maps services are used in your business workflows and applications.
Plan Your Migration to Azure Maps: Azure Maps provides a robust set of services that can easily replace deprecated Bing Maps functionalities. Begin planning the migration process, including which APIs to replace and any necessary redeployment efforts.
Leverage Azure Resources: Microsoft offers a wide range of tools, documentation, and support to help businesses transition from Bing Maps to Azure Maps smoothly. Utilize these resources to minimize migration friction.
Test and Optimize: Once you’ve integrated Azure Maps, ensure comprehensive testing is carried out to optimize performance, validate security, and ensure a seamless user experience.

Conclusion
The deprecation of Bing Maps services is a reminder of how rapidly technology evolves and the importance of staying ahead of these changes. With Azure Maps now positioned as the recommended service, businesses can continue to deliver exceptional geospatial experiences while benefiting from the modern, cloud-native infrastructure of Azure.

By transitioning to Azure Maps, businesses can unlock powerful new features, ensure better scalability, and provide their customers with enhanced mapping services. Now is the time to future-proof your operations by embracing Azure Maps as the new standard in geospatial solutions.

D365 JavaScript: Navigating Autocomplete Control and Address Copying Challenges

Introduction:

Microsoft Dynamics 365 (D365) is a powerful platform that allows businesses to manage various aspects of their operations. Leveraging JavaScript in D365 enables developers to enhance user experience and tailor the application to specific needs. In this blog, we’ll delve into a real-world scenario involving D365 JavaScript, where we encounter an intriguing challenge involving an autocomplete control and address copying.

The Challenge:

Imagine you’re customizing a D365 form, and you have a requirement to provide a user-friendly way for users to select a country using an autocomplete control. Additionally, you’re tasked with creating a checkbox that, when selected, copies all fields from Address 1 to Address 2. While implementing this, you encounter an issue: the JavaScript code you’ve used works seamlessly for all fields except the autocomplete control. Let’s explore this challenge further and discuss the solution you devised.

The JavaScript Code:

The JavaScript code you’ve provided attempts to handle the country field’s autocomplete control and the copying of fields from Address 1 to Address 2. While the code successfully copies field values for text fields, the autocomplete control poses a unique problem. This code works fine for copying the text address fields. For the autocomplete control, we have to save and refresh the page to see the updates.

formContext.getAttribute('address2_country').setValue(newFieldValue);

To get around this problem, I added the following code:

try {
  const element = parent.document.querySelector('[data-id="address2_country.fieldControl_container"] .wj-form-control[aria-label="Country"]');

  if (element) {
      element.outerHTML ='<input class="wj-form-control" style="font-weight: 600; color: rgb(0, 0, 0);" aria-label="Country" readonly type="text" value="' + newFieldValue + '">';
  }
} catch (e) {
  console.log(e.message);
}

In this snippet, you use the `setValue` method to set the value of the ‘address2_country’ attribute to `newFieldValue`. Subsequently, you attempt to manipulate the autocomplete control by locating the corresponding element and replacing it with an input element containing the new value.

The Autocomplete Control Challenge:

The issue you’re encountering with the autocomplete control stems from its complex nature. Autocomplete controls in D365 often involve intricate components and interactions that standard text input fields do not exhibit. My approach was to directly manipulating the element’s HTML element.

Conclusion:

Working with D365’s JavaScript capabilities can be immensely rewarding, but it can also present unique challenges, as demonstrated by the scenario of the autocomplete control and address copying. While your initial approach exhibited promise, autocomplete controls often require more intricate handling. By refining your strategy and exploring D365’s native methods and community resources, you can conquer this challenge and unlock the full potential of JavaScript customization in D365. Remember, JavaScript in D365 is a powerful tool – with a bit of creativity and perseverance, you can overcome any obstacle it presents.

Writing Dynamics C# Console App With Only Two Dependent Packages

Writing C# code for Dynamics 365 opens up numerous possibilities within the platform. It enables the ability to update data in Dynamics (Dataverse) and facilitates integration scenarios, such as connecting external systems with Dynamics. However, one of the common challenges we encounter is the dependency on the .NET version utilized by Dynamics, which currently mandates .NET 4.6.2 and entails several dependencies. These dependencies can present problems, particularly in larger projects. Surprisingly, even for a simple C# application, the list of dependencies can become quite extensive. To make matters worse, one of the dependencies, Microsoft.IdentityModel.Clients.ActiveDirectory, has been deprecated.

How do we get around so many dependent packages? What if we want to run our code under a newer .NET version like 6.0 or .net core 3.1? The good news is that we now have a great solution called Dataverse Client. The code is available on: GitHub PowerPlatform DataverseServiceClient

What’s really nice is that there are only two dependencies to run a simple console application:

DataverseCRUD.cs

Here is a sample CRUD program that connects to Dynamics 365, then create an account, read the account, update it and then delete it.

using System;
using Microsoft.PowerPlatform.Dataverse.Client;
using Microsoft.Xrm.Sdk;
using Microsoft.Xrm.Sdk.Query;
using Microsoft.Extensions.Configuration;

namespace DataverseClientCRUD
{
    class Program
    {
        static void Main(string[] args)
        {
            var builder = new ConfigurationBuilder()
                     .AddJsonFile("appsettings.json", true, true);
            IConfiguration config = builder.Build();
            string connectionString = config["ConnectionStrings:MyCRMServer"];
            using var serviceClient = new ServiceClient(connectionString);

            CRUD(serviceClient);
        }

        private static void CRUD(ServiceClient serviceClient)
        {
            //Create
            Console.WriteLine("**** Create ****");
            Entity account = new Entity("account");
            account["name"] = "ABC Corporation";
            account.Id = serviceClient.Create(account);

            //Read
            Console.WriteLine("**** Read ****");
            Entity readAccount = serviceClient.Retrieve(
                entityName: account.LogicalName,
                id: account.Id,
                columnSet: new ColumnSet("name")
            );
            Console.WriteLine("Retrieved account name: {0}", readAccount["name"]);

            //Update
            Console.WriteLine("**** Update ****");
            account["name"] = "ABC Corp";
            serviceClient.Update(account);

            //Delete
            Console.WriteLine("**** Delete ****");
            serviceClient.Delete(account.LogicalName, account.Id);
            serviceClient.Dispose();
        }
    }
}

appsettings.json

Create an appsettings.json file in Visual Studio and set the file to copy to output directory:


{
  "ConnectionStrings": {
    "MyCRMServer": "AuthType=ClientSecret;Url=https://XXXX.crm.dynamics.com;ClientId=XXXX;ClientSecret=XXXX"
  }
}

Dynamics 365 Interactive Dashboard Showing Inaccurate Data

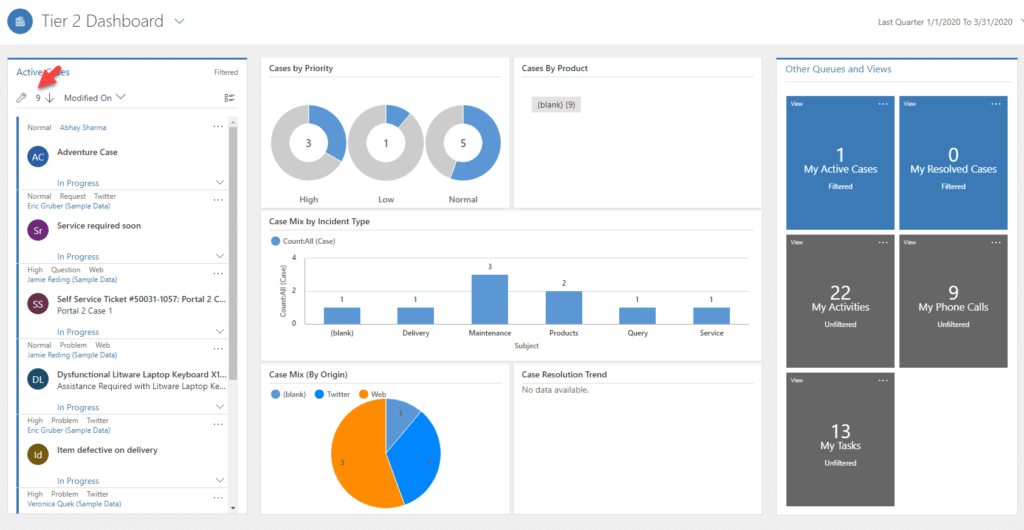
Interactive Dashboards in Dynamics 365 are highly valuable and offer crucial business insights into the data. However, I encountered an issue recently where the chart counts did not align with the stream counts. While the dashboard displayed the accurate data on the development server, the production server failed to reflect the correct chart counts in comparison to the stream (Grid on the left side). It’s important to note that the stream did display the correct counts, but the individual chart components did not.

Creating a new interactive dashboard fixed the problem, however I had end-users creating customized filters and I didn’t want to have to train them on how to recreate the filters. 

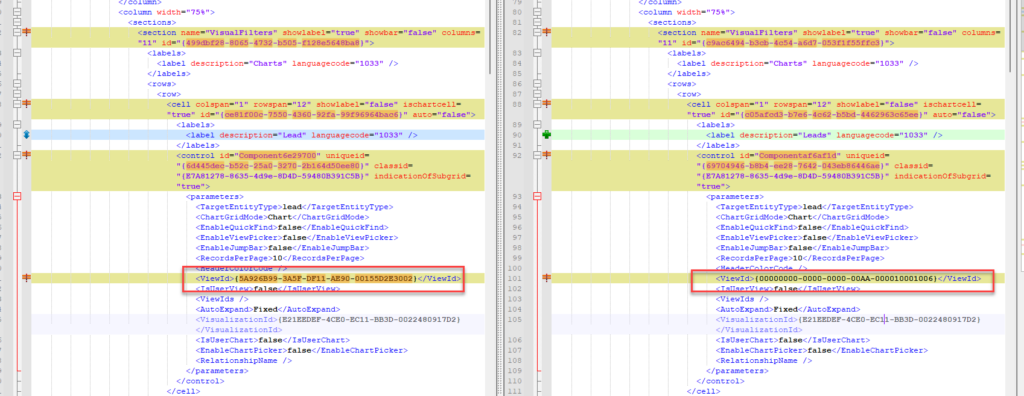
I decided to create a new solution with just the dashboard component and compare the solutions between the development copy and production copy. My handy Notepad++ compare utility showed me what’s different. Somehow during the deployment to production, the default view was pointing to a different GUID. I repackaged the solution and deployed to production and it started working again. Hopefully this will help others.