BlueSky’s Modern CRM Playbook Series: Lead Assignment in Dynamics 365

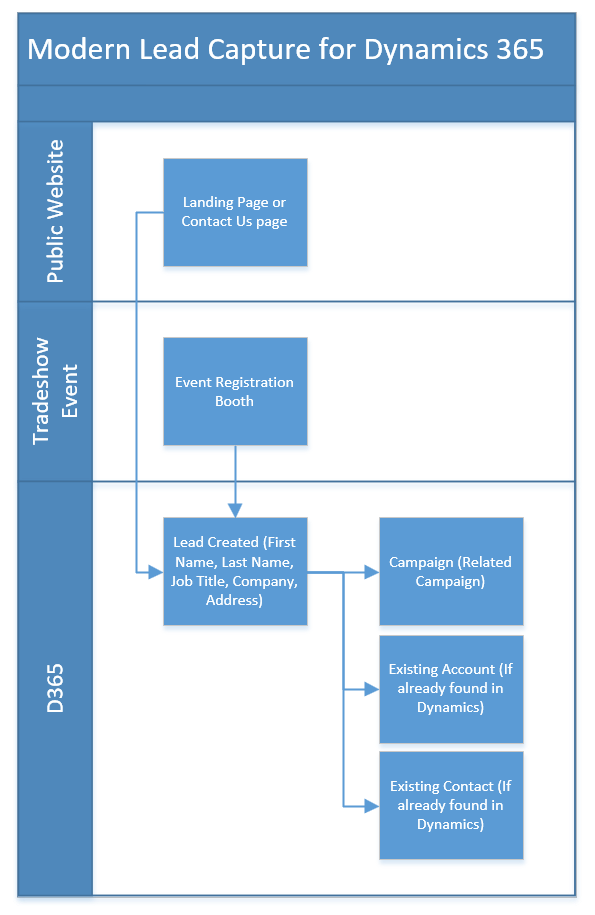
The faster you put the right seller on a new lead or opportunity, the higher your connect and conversion rates. Dynamics 365 gives you three solid paths: out-of-the-box Assignment Rules in Sales (via Work Assignment), a custom rules engine with Dataverse plug-ins, or a Power Automate flow that evaluates logic and assigns owners. Work Assignment (segments → sequences → assignment rules) natively supports round-robin and load-balancing, and can also factor seller availability and capacity.

Option 1 — Dynamics 365 Assignment Rules

What it is. Define conditions (segment + rule logic) and choose how to distribute: round-robin or load-balancing. You can assign to sellers, teams, or queues, and optionally respect seller availability windows and capacity. Records are processed in order of rules and there may be a short delay because the engine runs on a pooling interval. (Microsoft Learn)

  • Create rules for Leads, and Opportunities, then activate; rules run top-down, first match wins.
  • Round-robin vs load-balancing behavior, plus how availability buckets influence routing.
  • Match by seller attributes you define (e.g., language, territory modeled as an attribute) and/or fields on user records. Set the capacity per seller or team.
  • Practical limits: up to 10 record conditions; up to 5 seller/team/queue attribute conditions.

Licensing note. This feature requires Sales Enterprise or Sales Premium.

Option 2 — Custom Rules Engine with Dataverse Plug-ins

Why teams choose this. You want instant, in-transaction decisions with full control over logic, data joins, and fallbacks—no platform limits on condition counts. Register a plug-in on Lead/Opportunity Create or Update; run synchronously (pre/post operation) to decide ownership immediately, or asynchronously if the logic is heavy.
What you can model easily

  • Territory, product line, partner channel, language, or any custom attribute on User/Team.
  • Skills as a lookup/attribute (e.g., certifications) and apply seniority or weighting.
  • Workload checks (count of active records) similar to capacity, but fully customizable.


Option 3 — Custom Rules with Power Automate

Why teams choose this. You prefer low-code, cross-system logic, or want to call external services without writing C#. Use the Dataverse “When a row is added/modified” trigger, branch with conditions, look up User/Team, then Assign. Great for integration-driven routing (e.g., territory from ERP, reseller map from a SharePoint list).

Side-by-Side Comparison

FeatureAssignment Rules (Work Assignment)Custom Plug-in EnginePower Automate Flow
Best forFast, admin-managed routing with fairness (round-robin / load balancing), availability, capacity.Maximum control, transactional decisions, complex logic, near-zero routing latency.Low-code, cross-app logic, calling external systems and services without C#.
Supported recordsLeads, OpportunitiesAny tableAny table with Dataverse trigger.
Distribution modesRound-robin and Load-balancing; can consider availability buckets and capacity.Whatever you code (round-robin, weighted, ML score thresholds, SLAs).Build your own (round-robin lists, counters, or capacity from Dataverse).
Territory/skillsUse seller attributes or user fields; model “skills/territory” as attributes.Full freedom (custom lookups, weightings, decay).Full freedom (tables + connectors).
Availability windows“Assign if seller is available within N hours.”Implement calendars/working hours checks in code.Check calendars/shift tables or Outlook/Graph via connectors.
Rule limitsUp to 10 record conditions; up to 5 seller/team/queue conditions; first-match rule wins.No platform limits (your code/runtime only).No hard rule limits; flow complexity grows with branches.
LatencyEngine runs on a pooling interval; slight delay possible.Synchronous plug-ins execute in-transaction (fast); async via queue.Near-real-time; depends on trigger and service load.
LoggingSystem behavior visible; fewer low-level logs.PluginTraceLog / ITracingService, App Insights options.Built-in run history, retries, error handling.
LicensingUnder Sales Enterprise / Sales Premium licenseIncluded with Dataverse; developer effort required.Power Automate Premium for Dataverse & many connectors.
Admin effortLow/medium (configure in Sales Hub).High upfront (C#), lowest runtime cost.Medium (low-code), ongoing flow governance.

Quick take

  • If you want fast, fair, admin-friendly routing, and cost is not an issue, start with Assignment Rules.
  • If you need real-time, instant, complex logic (and developer resources), use a plug-in.
  • If you need cross-system logic with minimal code, use Power Automate.

BlueSky’s Modern CRM Playbook Series: AI Based Lead Scoring

Why lead scoring matters?

Your reps should start every day with the right list. Dynamics 365 Sales gives you two viable paths: Microsoft’s predictive lead scoring (quick to turn on, AI-driven from your CRM history) and a custom model with Power Automate (you control the signals, weights, and when/how scores update).

Path A — Microsoft’s Predictive Lead Scoring

What it is. A built-in model that analyzes your historical wins/losses to score open leads. You can see top influencing factors and use scores anywhere in Sales (views, dashboards, routing).

Licensing note. Predictive lead scoring requires the Dynamics 365 Sales Enterprise tier. Microsoft’s docs also note an allowance of 1,500 scored records per month with Enterprise.

Where to turn it on (Microsoft Learn). Sales Hub Sales Insights settingsLead scoring.

Good for

  • Fast time-to-value if you have clean history in CRM.
  • Teams that want “good default” AI without building/maintaining rules.
  • UI graphics that shows lead score and grade overtime.

Watch-outs

  • Limited control over the exact features/weights used by the model.
  • Monthly scoring capacity is limited on Enterprise license; advanced Sales Insights features can require additional licensing.

Path B — Custom Lead Scoring with Power Automate + AI (recommended for control)

Why teams choose this route. You decide what “hot” means and can blend firmographics + history + live intent. A flow runs at lead create/update, computes your score, and writes it back to a custom field on Lead.

Example signals we include

  • Company Size (e.g., employee count or revenue band → larger = higher weight)
  • Job Title (C-level/VP/Director > Manager > Individual Contributor)
  • Previous Purchase (frequency/recency/amount → upsell potential)
  • AI-derived Intent from Request Description
    Use AI to read the free-text “How can we help?” and infer purchase intent (e.g., “Need pricing and delivery lead time for 200 units next month” → High).

How it works (flow blueprint)

  1. Trigger: When a Lead is created/updated in Dataverse.
  2. Enrich: Look up Account size, last order, role seniority, etc.
  3. Intent AI step:
    • Use AI Builder (Category Classification/Prompt-based sentiment/Custom prompt) to classify purchase intent from the description; or
    • Call an Azure OpenAI endpoint via HTTP for a custom intent/confidence output.
  4. Score: Calculate a 0–100 score with your weights.
  5. Write back: Update custom fields: c_leadscore and c_scoregrade on the Lead.

Licensing/capacity: Custom scoring flows typically require Power Automate Premium for Dataverse/premium connectors, and AI Builder credits if you use AI Builder models.

Scoring sketch (example weights)

  • Company Size (0–30)
  • Job Title seniority (0–25)
  • Previous Purchase recency/value (0–25)
  • AI Intent from description (Low/Med/High → 0/10/20)

What does “better results” look like?

Whichever path you choose, treat scoring like a product: monitor conversion by score band, tune thresholds/weights monthly, and A/B test routing rules. Use predictive scoring as a baseline, then move to (or augment with) a custom flow when you need richer signals or tighter control.

Side-by-side comparison


Microsoft Predictive Lead Scoring

Custom Power Automate + AI

Setup speed

Quick: enable in Sales Insights and publish a model.

Medium: build a Dataverse flow, define weights, add AI step.

Signals

Model chooses/weights historical factors; you can view/edit influencing attributes.

You pick the exact features: Company Size, Job Title, Previous Purchase, AI-parsed Request Description (intent), plus any external data.

Control/Transparency

Good visibility, limited control of the underlying algorithm.

Full control over features, weights, thresholds, and when scores update.

Licensing & capacity

Requires Sales Enterprise; ~1,500 scored records/month noted in Microsoft docs; some Sales Insights features may need additional licensing.

Power Automate Premium for flows & premium connectors; AI Builder credits if using AI Builder models (capacity-based).

Best fit

Teams with strong historical data that want fast, standard AI.

Teams needing precise business rules and richer intent signals.

BlueSky’s Modern CRM Playbook Series: Modern Lead Capture for Dynamics 365

Turn website and tradeshow inquiries into CRM-ready Leads
Before you optimize conversion, get the first mile right: every inquiry lands in Dynamics 365 fast, complete, and consistent. This guide stays focused on website forms → D365 and tradeshow/mobile capture → D365. We’ll cover event programs with Dynamics 365 Journeys in a future article.

Why Sales & Marketing should care

• Faster follow-up: inquiries appear in Dynamics within minutes—no CSVs, no black holes.
• Trustable attribution: UTMs and landing pages travel with the Lead for ROI reporting.
• Cleaner execution: one place for reps to work, one source of truth for marketers.

Part 1 — Capture from your website directly into Dynamics 365

Keep the form short
Visible fields: First Name, Last Name, Email, Company, optional Phone, “How can we help?”
Hidden/system fields:
• UTMs: utm_source, utm_medium, utm_campaign
• Page context: landing_page_url, referrer_url

Two proven implementation paths

A) Dynamics 365 Marketing / Customer Insights – Journeys forms
• Build a Marketing Form, place it on your site.
• Map fields 1:1 to Dataverse Lead columns.
• Real-time submission creates/updates the Lead immediately.
B) Your CMS form + Power Automate (webhook)
1. Form POSTs to a secure Power Automate HTTP trigger.
2. Lock POSTs request to a public website IP address.
3. Normalize inputs (lowercase/trim email) and guard missing values.
4. De-duplicate via Dataverse “List rows” on emailaddress1 (consider company domain too).
5. Create/Update Lead with mapped fields, UTMs, and consent.

Lead Quality & Spam Prevention: Protect forms with CAPTCHA to stop bot entries.

Part 2 — Capture tradeshow & event Leads → Dynamics 365

(Tools like iCapture are great examples. You can also build a lightweight Power Apps mobile app for badge/card capture.)
We’ll cover Dynamics 365 Journeys for full event programs (registrations, attendance) in a later article.
A standard template reps actually use
Required: Event Name, Date, Lead Source = Tradeshow, First/Last, Email, Company, Phone, Campaign (Hidden Field)
Context: Interest (picklist), Notes/Next Step, Hot/Warm flag, Scan Type (Badge/Card)

Two integration patterns

A) iCapture → Dynamics connector (fastest to deploy)
• Map fields to Lead columns; enable immediate sync and image upload (Notes).
B) Power Apps (Canvas) mobile app → Dataverse (build your own)
• Use the device camera to snap badges/cards; write directly to Lead + Notes.
• Perfect when you want tight customization (custom picklists, offline first, rep login).
• Sync logic mirrors the website flow (normalize, de-dupe, create/update).

Day-of-show best practices
• Require Email where possible
• Photo the badge/card for cleanup and context
• Make sure you attribute the badge scan to a campaign (This will help calculate ROI for tradeshows)
• Real-time sync of data

Data enrichment

Once a Lead exists, add the context Sales needs—without bloating your public forms.
Light, sales-useful enrichment ideas
• Company basics: Number of employees, industry (SIC or NAICS Codes), HQ country/region, Annual Revenue
• Account match: link to existing Account by domain, suggest Account Owner
• Territory helper: derive region/state for future routing
How to do it
• Power Automate calls to approved enrichment sources or internal lookups
• Write to dedicated fields and surface them on the Lead form so reps see value immediately.
Keep enrichment purposeful and transparent.

What’s next

With capture and enrichment humming, you’re ready to layer on scoring, routing, and sequences—and to connect event programs via Dynamics 365 Journeys (registrations, session scans, attendance → CRM). We’ll cover that in the next article.

Dynamics 365 Generative AI Pages show blank for users? It’s permissions.

Summary

If administrators can view a Generative AI page in Dynamics 365 but other users encounter a blank screen, the issue is likely missing privileges on two tables. Grant Read and Write permissions on UX Agent Component and UX Agent Component Revision to resolve the issue and ensure the page renders for all users.


What Generative AI Pages bring to D365

Generative AI pages (preview) let makers create task-focused experiences that blend AI-generated summaries, quick actions, and contextual data on a single screen. The result: faster onboarding, more consistent processes, and fewer clicks across forms and views.
(Example walkthrough by Reza Dorrani)


Symptom

Recently, I built a Generative AI page with a Kanban view. Administrators can see the page; however non-admins open the same page and see a completely blank page—no visible errors. I tried to impersonate the user role, however it continued to work fine for me.


Root cause

The preview introduces new underlying components. Non-admin roles typically don’t have the needed privileges by default, so the page definition can’t be read/written at runtime and the canvas stays blank.


The fix – add the missing privileges into an existing role

  1. Navigate to Power Platform Admin Center > Environments > Select your environment > Settings > Users + permissions > Security roles

  2. Open the security role you would like to update.

  3. Find the following two tables and grant Read and Write:

    • UX Agent Component

    • UX Agent Component Revision


  4. Save the security role and re-test.


Verify it worked

  • Sign in as a non-admin test user.

  • Open the AI page.

  • Hard refresh (Ctrl+F5).

  • The page should now render instead of a blank surface.


Conclusion

Generative AI pages are one of the most impactful D365 additions in years. If non-admins see a blank page, it’s almost always missing privileges on the preview components. Grant Read and Write on UX Agent Component and UX Agent Component Revision, then re-test—your users should see exactly what the admins do.

Dynamics 365 System Fields Challenge: Disabling the Owner Field with JavaScript

When working with Dynamics 365, most custom fields behave exactly as you’d expect. For instance, if you want to disable a custom field on a form, a simple call like this works seamlessly:

formContext.getControl("custom_fieldname").setDisabled(true);

However, when it comes to system fields like the Owner field (ownerid) you might run into unexpected behavior. In this post, we’ll explore why this happens and how to work around it.


The Issue with System Fields

Dynamics 365 uses system fields such as ownerid to manage essential data (in this case, the record owner). Unlike most custom fields, system fields like ownerid often appear in multiple places on a form. For example, the Owner field can be displayed both in the main form body and in the header. This duplication means that the standard approach of retrieving a control with:

formContext.getControl("ownerid").setDisabled(false);

…can fail or only affect one instance of the control. In our case, you might see an error such as:

TypeError: Cannot read properties of null (reading 'setDisabled')

This error occurs because Dynamics 365 isn’t returning a single control reference for ownerid—or it’s returning null for one of the instances—making it necessary to handle these controls differently.


The Workaround: Iterating Over All Controls

The solution is to retrieve the attribute rather than a single control, then iterate over all associated controls. Each instance of the control can be accessed via the attribute’s controls collection. Here’s how you can do it:

formContext.getAttribute("ownerid").controls.forEach(function (ctrl) {
    ctrl.setDisabled(false);
});

Breaking It Down

  1. Retrieve the Attribute:

    • formContext.getAttribute("ownerid") fetches the attribute object, which represents the data for the Owner field across all form instances.
  2. Access All Controls:

    • Every control bound to the ownerid attribute is stored in the controls collection. This collection might include the header control, the body control, or any other instance present on the form.
  3. Iterate and Disable:

    • Using the forEach loop, we iterate through each control in the collection and call setDisabled(false) on it. This ensures that no matter where the Owner field appears on the form, it is enabled or disabled as intended.

Conclusion

Dynamics 365 provides robust capabilities for customizing forms, but system fields like Owner come with their own set of quirks. While custom fields handle setDisabled without issue, system fields might require you to iterate over multiple controls due to their multi-instance rendering on a form.

By retrieving the attribute and iterating over its controls, you can ensure that all instances of a system field like ownerid are properly updated, leading to a more consistent and error-free user experience. Understanding these nuances not only helps in solving current issues but also empowers you to better manage other system fields in Dynamics 365.

Microsoft Bing Maps Discontinued Services

Introduction
On May 21, 2024, Microsoft announced the deprecation of several key features and services within Bing Maps (Link),  signaling a new direction for organizations relying on these tools for geospatial needs. As many businesses and developers have depended on Bing Maps for location-based services, it is crucial to understand what’s changing, how it affects your workflows, and the recommended alternatives.

The article states that “Customers with an enterprise license have until June 30, 2028, to transition to Azure Maps, while customers on the free and basic license for Bing Maps for Enterprise have until June 30, 2025”.

In this post, we’ll explore the discontinued Bing Maps services, the rationale behind these changes, and how Azure Maps is now the go-to solution for all your geospatial needs.

What is Changing?
Microsoft has released a comprehensive list of Bing Maps services that are being phased out. These services have been essential for many organizations, offering functionalities such as geocoding, routing, traffic data, and more. The main services being deprecated include:

  • Bing Maps REST Services
  • Bing Maps SOAP Services
  • Bing Maps Web Control 6.3

These services have powered numerous location-based applications, but with evolving technology standards and performance expectations, Microsoft is retiring them to make way for newer, more robust solutions.

Why Is Microsoft Making These Changes?
Microsoft’s decision to discontinue these services is driven by a focus on modernization and a shift toward cloud-native solutions. Older technologies like the Bing Maps SOAP Services and Web Control have become outdated, with newer tools offering better performance, security, and integration capabilities.

This change also reflects broader trends in the industry, with cloud-based services becoming more dominant, offering better scalability, real-time data processing, and higher levels of security.

Azure Maps: The New Standard
As Microsoft phases out Bing Maps, Azure Maps emerges as the recommended and supported geospatial service. Built on the Azure cloud platform, Azure Maps offers a comprehensive suite of mapping and location-based services designed to meet modern business needs.

Steps to Transition to Azure Maps

Audit Your Bing Maps Integrations: Conduct a thorough audit of all the places where Bing Maps services are used in your business workflows and applications.
Plan Your Migration to Azure Maps: Azure Maps provides a robust set of services that can easily replace deprecated Bing Maps functionalities. Begin planning the migration process, including which APIs to replace and any necessary redeployment efforts.
Leverage Azure Resources: Microsoft offers a wide range of tools, documentation, and support to help businesses transition from Bing Maps to Azure Maps smoothly. Utilize these resources to minimize migration friction.
Test and Optimize: Once you’ve integrated Azure Maps, ensure comprehensive testing is carried out to optimize performance, validate security, and ensure a seamless user experience.

Conclusion
The deprecation of Bing Maps services is a reminder of how rapidly technology evolves and the importance of staying ahead of these changes. With Azure Maps now positioned as the recommended service, businesses can continue to deliver exceptional geospatial experiences while benefiting from the modern, cloud-native infrastructure of Azure.

By transitioning to Azure Maps, businesses can unlock powerful new features, ensure better scalability, and provide their customers with enhanced mapping services. Now is the time to future-proof your operations by embracing Azure Maps as the new standard in geospatial solutions.

Missing Competitor Field in Dynamics 365 Opportunity: Debugging the “Close as Lost” Button

In a recent project involving Dynamics 365 for Sales, I encountered a peculiar issue where the “Close as Lost” button on an opportunity didn’t show the Competitor field, which is usually expected when accessing the close dialog. There were no custom plugins or workflow assemblies that could have contributed to this problem. So, I embarked on a journey to debug the issue, ultimately uncovering some hidden configuration that caused this behavior.

Problem Description

The typical “Close as Lost” dialog in Dynamics 365 provides a field to specify the competitor who won the deal. However, in this particular instance, the competitor field was conspicuously absent (as shown in the image below. This was confusing because no customizations should have interfered with this standard feature.

Initial Investigations

After verifying that no unusual plugins or workflows were active, I decided to dive deeper into the client-side logic. I inspected the JavaScript behind the “Close as Lost” button to see if there were any parameters or conditions being set that would hide the competitor field. I came across a crucial piece of code that read a specific parameter controlling whether the competitor field would be displayed or not.

Here’s a snippet from the code:

if (ClientUtility.DataUtil.isNullOrUndefined(hideCompetitorFieldAttribute)) {
   hideCompetitorField = hideCompetitorFieldAttribute.getValue();
}

This code was checking if the competitor field should be hidden, and in this case, it was set to “true.”

The Hidden Culprit: An Extra Boolean Parameter

Finally, I stumbled upon the root cause when reviewing the ribbon configuration in Ribbon Workbench. As it turns out, the “Close as Lost” button had an extra Boolean parameter configured by a previous consultant. This Boolean parameter was set to true, effectively hiding the competitor field.

This additional Boolean parameter was unnecessary and had inadvertently caused the competitor field to be hidden during the closure process. Once this parameter was removed or set to false, the competitor field reappeared as expected in the “Close as Lost” dialog.

Resolution Steps

Using Ribbon Workbench, I found an unnecessary Boolean parameter that had been added to the button’s configuration.
Fix: I updated the configuration by either removing the Boolean parameter or setting its value to false.


Conclusion

This issue highlights the importance of double-checking even the smallest customizations in Dynamics 365. A minor oversight, like an extra Boolean parameter, can have significant effects on user experience and business processes. Always ensure that customizations are documented and reviewed, especially when they affect standard features like opportunity closure.

Have you ever encountered a similar issue with missing fields in Dynamics 365? Share your experience in the comments below!

Overcoming FetchXML Limitations: Calculating “Newer-Than-X-Days” with Microsoft Formula Columns

Introduction:

In the realm of Dynamics 365 and FetchXML queries, users often find themselves grappling with limitations, especially when it comes to date filtering. A date filter allowing the display of records “newer” than 90 days from today is currently unavailable. The absence of a straightforward “newer-than-x-days” option in FetchXML has led many to seek alternative solutions. Fortunately, developers like Jonas Rapp and Mark Carrington have proposed workarounds that involve leveraging outer-join functionalities. However, these methods may not simple to implement by end-users. 

The Calculated Field Conundrum: 

Attempting to create a calculated field to bridge the gap presents its own set of challenges. The error message, “This operation cannot be performed on values which are of different Date Time Behaviors,” is a roadblock, particularly when dealing with “Date Only” fields like “Estimated Close Date.” This limitation can be frustrating, hindering the seamless execution of desired date calculations.

A Glimmer of Hope: Microsoft Formula Columns: 

Enter Microsoft formula columns, this alternative method provides a way to perform date calculations without running into the Date Time Behavior mismatch issue. By employing a straightforward formula, users can effortlessly calculate the number of days in the future from the current date.

The Solution: DateDiff Function:

The key to overcoming the FetchXML limitations lies in the DateDiff function provided by Microsoft formula columns. By utilizing this function, users can perform date calculations efficiently. Let’s take a look at a simple example:

DateDiff(UTCToday(), 'Estimated Close Date')

This formula calculates the difference in days between the current date (UTCToday()) and the value in the “Estimated Close Date” field. By using this approach, you can easily filter records based on a “newer-than-x-days” criterion.

Conclusion: 

While FetchXML may present certain limitations, the innovative use of Microsoft formula columns provides a robust solution to the challenge of date filtering. By embracing these alternative methods, users can enhance their Dynamics 365 experience and gain more flexibility in managing and querying data. So, the next time you find yourself grappling with date-related queries, remember the power of Microsoft formula columns to streamline your processes and make your Dynamics 365 journey smoother.

Revolutionizing Business Efficiency: Migrating from a “Broken” On-Premise CRM to Dynamics 365 in the Cloud

Introduction

In the fast-paced world of modern business, digital transformation is the key to staying competitive and relevant. An essential component of this transformation involves transitioning from outdated on-premise systems, such as traditional Customer Relationship Management (CRM) software, to advanced cloud-based solutions. This article explores the journey of migrating from a “broken” CRM system hosted on-premise to Microsoft Dynamics 365 in the cloud. Additionally, it emphasizes the critical role of strategy mapping to ensure alignment between the end system and business processes.

The Legacy of On-Premise Systems

Once considered groundbreaking, legacy on-premise CRM systems often turn into operational hindrances for various reasons:

  1. Maintenance and Upgrades: Maintaining and upgrading legacy systems comes with high costs and disruptions.
  2. Scalability Constraints: Expanding or downsizing an on-premise system is complex and time-intensive, hindering agility.
  3. Accessibility Limitations: On-premise systems restrict accessibility, inhibiting remote work and real-time collaboration.
  4. Integration Complexities: Integrating outdated systems with newer applications can be intricate and costly.
  5. Security Vulnerabilities: Aging systems are susceptible to security breaches and data vulnerabilities.

Elevating Business with Dynamics 365 in the Cloud

Migration to Microsoft Dynamics 365 in the cloud presents a multitude of advantages to address these challenges:

  1. Operational Costs: Cloud-based solutions eliminate upfront hardware investments and ongoing maintenance costs.
  2. Scalability and Flexibility: Dynamics 365 on the cloud adapts resources to demand, ensuring optimal performance.
  3. Remote Accessibility: Cloud platforms enable anytime, anywhere access, fostering remote work and bolstering productivity.
  4. Streamlined Integration: Dynamics 365 offers seamless integration capabilities, connecting with other applications effortlessly.
  5. Robust Security: Microsoft’s cloud services provide robust security features, including encryption and regular updates.

Strategy Mapping: Fusing Technology with Business Ambitions

A triumphant migration to Dynamics 365 hinges on more than just technological decisions. Strategy mapping is pivotal to ensure that the new CRM system aligns with business processes and objectives.

  1. Process Assessment: Before migration, analyze existing processes to identify pain points and opportunities for enhancement.
  2. Clear Goals: Define the CRM migration’s objectives—be it enhancing customer engagement, optimizing sales procedures, or refining data analytics.
  3. Stakeholder Involvement: Engage key stakeholders from various departments to shape the new system according to their needs.
  4. Customized Adaptations: Tailor Dynamics 365 to match your organization’s workflows, accommodating specific processes.
  5. Change Management: Prepare employees for the transition through training and communication about the system’s benefits. Address concerns for smooth adoption.
  6. Continuous Refinement: Regularly evaluate the system’s performance against objectives post-migration. Make necessary adjustments to maintain alignment with business goals.

Conclusion

Transitioning from a “broken” on-premise CRM system to Microsoft Dynamics 365 in the cloud is a strategic move that can rejuvenate business operations. The benefits of cost-effectiveness, scalability, accessibility, integration, and security are compelling reasons to embrace this transformation. Yet, the key to success lies in meticulous strategy mapping that ensures Dynamics 365 aligns seamlessly with business processes and ambitions. By intertwining technological innovation with a comprehensive business strategy, organizations can realize a seamless and impactful digital transformation.

D365 JavaScript: Navigating Autocomplete Control and Address Copying Challenges

Introduction:

Microsoft Dynamics 365 (D365) is a powerful platform that allows businesses to manage various aspects of their operations. Leveraging JavaScript in D365 enables developers to enhance user experience and tailor the application to specific needs. In this blog, we’ll delve into a real-world scenario involving D365 JavaScript, where we encounter an intriguing challenge involving an autocomplete control and address copying.

The Challenge:

Imagine you’re customizing a D365 form, and you have a requirement to provide a user-friendly way for users to select a country using an autocomplete control. Additionally, you’re tasked with creating a checkbox that, when selected, copies all fields from Address 1 to Address 2. While implementing this, you encounter an issue: the JavaScript code you’ve used works seamlessly for all fields except the autocomplete control. Let’s explore this challenge further and discuss the solution you devised.

The JavaScript Code:

The JavaScript code you’ve provided attempts to handle the country field’s autocomplete control and the copying of fields from Address 1 to Address 2. While the code successfully copies field values for text fields, the autocomplete control poses a unique problem. This code works fine for copying the text address fields. For the autocomplete control, we have to save and refresh the page to see the updates.

formContext.getAttribute('address2_country').setValue(newFieldValue);

To get around this problem, I added the following code:

try {
  const element = parent.document.querySelector('[data-id="address2_country.fieldControl_container"] .wj-form-control[aria-label="Country"]');

  if (element) {
      element.outerHTML ='<input class="wj-form-control" style="font-weight: 600; color: rgb(0, 0, 0);" aria-label="Country" readonly type="text" value="' + newFieldValue + '">';
  }
} catch (e) {
  console.log(e.message);
}

In this snippet, you use the `setValue` method to set the value of the ‘address2_country’ attribute to `newFieldValue`. Subsequently, you attempt to manipulate the autocomplete control by locating the corresponding element and replacing it with an input element containing the new value.

The Autocomplete Control Challenge:

The issue you’re encountering with the autocomplete control stems from its complex nature. Autocomplete controls in D365 often involve intricate components and interactions that standard text input fields do not exhibit. My approach was to directly manipulating the element’s HTML element.

Conclusion:

Working with D365’s JavaScript capabilities can be immensely rewarding, but it can also present unique challenges, as demonstrated by the scenario of the autocomplete control and address copying. While your initial approach exhibited promise, autocomplete controls often require more intricate handling. By refining your strategy and exploring D365’s native methods and community resources, you can conquer this challenge and unlock the full potential of JavaScript customization in D365. Remember, JavaScript in D365 is a powerful tool – with a bit of creativity and perseverance, you can overcome any obstacle it presents.